資訊內容
詳解使用PyTorch實現目標檢測與跟蹤
 V6r少兒編程網-Scratch_Python_教程_免費兒童編程學習平臺
大量免費學習推薦,敬請訪問python教程(視頻)V6r少兒編程網-Scratch_Python_教程_免費兒童編程學習平臺
引言
V6r少兒編程網-Scratch_Python_教程_免費兒童編程學習平臺
在昨天的文章中,我們介紹了如何在PyTorch中使用您自己的圖像來訓練圖像分類器,然后使用它來進行圖像識別。本文將展示如何使用預訓練的分類器檢測圖像中的多個對象,并在視頻中跟蹤它們。V6r少兒編程網-Scratch_Python_教程_免費兒童編程學習平臺
圖像中的目標檢測V6r少兒編程網-Scratch_Python_教程_免費兒童編程學習平臺
目標檢測的算法有很多,YOLO跟SSD是現下**流行的算法。在本文中,我們將使用YOLOv3。在這里我們不會詳細討論YOLO,如果想對它有更多了解,可以參考下面的鏈接哦~(https://pjreddie.com/darknet/yolo/)V6r少兒編程網-Scratch_Python_教程_免費兒童編程學習平臺
下面讓我們開始吧,依然從導入模塊開始:V6r少兒編程網-Scratch_Python_教程_免費兒童編程學習平臺
from models import * from utils import * import os, sys, time, datetime, random import torch from torch.utils.data import DataLoader from torchvision import datasets, transforms from torch.autograd import Variable import matplotlib.pyplot as plt import matplotlib.patches as patches from PIL import Image然后加載預訓練的配置和權重,以及一些預定義的值,包括:圖像的尺寸、置信度閾值和非**大抑制閾值。V6r少兒編程網-Scratch_Python_教程_免費兒童編程學習平臺
config_path='config/yolov3.cfg' weights_path='config/yolov3.weights' class_path='config/coco.names' img_size=416 conf_thres=0.8 nms_thres=0.4 # Load model and weights model = Darknet(config_path, img_size=img_size) model.load_weights(weights_path) model.cuda() model.eval() classes = utils.load_classes(class_path) Tensor = torch.cuda.FloatTensor下面的函數將返回對指定圖像的檢測結果。V6r少兒編程網-Scratch_Python_教程_免費兒童編程學習平臺
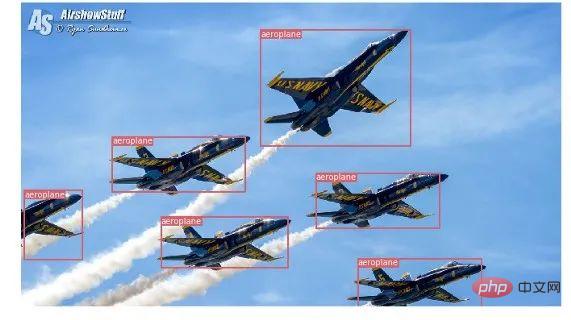
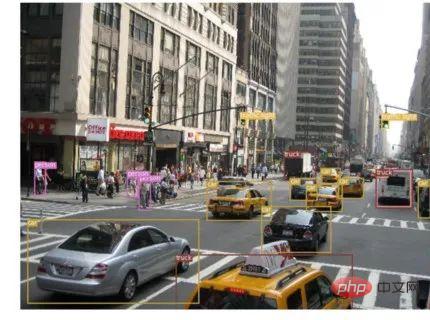
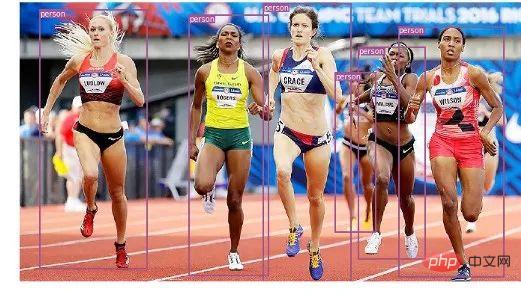
def detect_image(img): # scale and pad image ratio = min(img_size/img.size[0], img_size/img.size[1]) imw = round(img.size[0] * ratio) imh = round(img.size[1] * ratio) img_transforms=transforms.Compose([transforms.Resize((imh,imw)), transforms.Pad((max(int((imh-imw)/2),0), max(int((imw-imh)/2),0), max(int((imh-imw)/2),0), max(int((imw-imh)/2),0)), (128,128,128)), transforms.ToTensor(), ]) # convert image to Tensor image_tensor = img_transforms(img).float() image_tensor = image_tensor.unsqueeze_(0) input_img = Variable(image_tensor.type(Tensor)) # run inference on the model and get detections with torch.no_grad(): detections = model(input_img) detections = utils.non_max_suppression(detections, 80, conf_thres, nms_thres) return detections[0]**后,讓我們通過加載一個圖像,獲取檢測結果,然后用檢測到的對象周圍的包圍框來顯示它。并為不同的類使用不同的顏色來區分。V6r少兒編程網-Scratch_Python_教程_免費兒童編程學習平臺
# load image and get detections img_path = "images/blueangels.jpg" prev_time = time.time() img = Image.open(img_path) detections = detect_image(img) inference_time = datetime.timedelta(seconds=time.time() - prev_time) print ('Inference Time: %s' % (inference_time)) # Get bounding-box colors cmap = plt.get_cmap('tab20b') colors = [cmap(i) for i in np.linspace(0, 1, 20)] img = np.array(img) plt.figure() fig, ax = plt.subplots(1, figsize=(12,9)) ax.imshow(img) pad_x = max(img.shape[0] - img.shape[1], 0) * (img_size / max(img.shape)) pad_y = max(img.shape[1] - img.shape[0], 0) * (img_size / max(img.shape)) unpad_h = img_size - pad_y unpad_w = img_size - pad_x if detections is not None: unique_labels = detections[:, -1].cpu().unique() n_cls_preds = len(unique_labels) bbox_colors = random.sample(colors, n_cls_preds) # browse detections and draw bounding boxes for x1, y1, x2, y2, conf, cls_conf, cls_pred in detections: box_h = ((y2 - y1) / unpad_h) * img.shape[0] box_w = ((x2 - x1) / unpad_w) * img.shape[1] y1 = ((y1 - pad_y // 2) / unpad_h) * img.shape[0] x1 = ((x1 - pad_x // 2) / unpad_w) * img.shape[1] color = bbox_colors[int(np.where( unique_labels == int(cls_pred))[0])] bbox = patches.Rectangle((x1, y1), box_w, box_h, linewidth=2, edgecolor=color, facecolor='none') ax.add_patch(bbox) plt.text(x1, y1, s=classes[int(cls_pred)], color='white', verticalalignment='top', bbox={'color': color, 'pad': 0}) plt.axis('off') # save image plt.savefig(img_path.replace(".jpg", "-det.jpg"), bbox_inches='tight', pad_inches=0.0) plt.show()下面是我們的一些檢測結果:V6r少兒編程網-Scratch_Python_教程_免費兒童編程學習平臺
 V6r少兒編程網-Scratch_Python_教程_免費兒童編程學習平臺
 V6r少兒編程網-Scratch_Python_教程_免費兒童編程學習平臺
 V6r少兒編程網-Scratch_Python_教程_免費兒童編程學習平臺
視頻中的目標跟蹤V6r少兒編程網-Scratch_Python_教程_免費兒童編程學習平臺
現在你知道了如何在圖像中檢測不同的物體。當你在一個視頻中一幀一幀地看時,你會看到那些跟蹤框在移動。但是如果這些視頻幀中有多個對象,你如何知道一個幀中的對象是否與前一個幀中的對象相同?這被稱為目標跟蹤,它使用多次檢測來識別一個特定的對象。V6r少兒編程網-Scratch_Python_教程_免費兒童編程學習平臺
有多種算法可以做到這一點,在本文中決定使用SORT(Simple Online and Realtime Tracking),它使用Kalman濾波器預測先前識別的目標的軌跡,并將其與新的檢測結果進行匹配,非常方便且速度很快。V6r少兒編程網-Scratch_Python_教程_免費兒童編程學習平臺
現在開始編寫代碼,前3個代碼段將與單幅圖像檢測中的代碼段相同,因為它們處理的是在單幀上獲得 YOLO 檢測。差異在**后一部分出現,對于每個檢測,我們調用 Sort 對象的 Update 函數,以獲得對圖像中對象的引用。因此,與前面示例中的常規檢測(包括邊界框的坐標和類預測)不同,我們將獲得跟蹤的對象,除了上面的參數,還包括一個對象 ID。并且需要使用OpenCV來讀取視頻并顯示視頻幀。V6r少兒編程網-Scratch_Python_教程_免費兒童編程學習平臺
videopath = 'video/interp.mp4' %pylab inline import cv2 from IPython.display import clear_output cmap = plt.get_cmap('tab20b') colors = [cmap(i)[:3] for i in np.linspace(0, 1, 20)] # initialize Sort object and video capture from sort import * vid = cv2.VideoCapture(videopath) mot_tracker = Sort() #while(True): for ii in range(40): ret, frame = vid.read() frame = cv2.cvtColor(frame, cv2.COLOR_BGR2RGB) pilimg = Image.fromarray(frame) detections = detect_image(pilimg) img = np.array(pilimg) pad_x = max(img.shape[0] - img.shape[1], 0) * (img_size / max(img.shape)) pad_y = max(img.shape[1] - img.shape[0], 0) * (img_size / max(img.shape)) unpad_h = img_size - pad_y unpad_w = img_size - pad_x if detections is not None: tracked_objects = mot_tracker.update(detections.cpu()) unique_labels = detections[:, -1].cpu().unique() n_cls_preds = len(unique_labels) for x1, y1, x2, y2, obj_id, cls_pred in tracked_objects: box_h = int(((y2 - y1) / unpad_h) * img.shape[0]) box_w = int(((x2 - x1) / unpad_w) * img.shape[1]) y1 = int(((y1 - pad_y // 2) / unpad_h) * img.shape[0]) x1 = int(((x1 - pad_x // 2) / unpad_w) * img.shape[1]) color = colors[int(obj_id) % len(colors)] color = [i * 255 for i in color] cls = classes[int(cls_pred)] cv2.rectangle(frame, (x1, y1), (x1+box_w, y1+box_h), color, 4) cv2.rectangle(frame, (x1, y1-35), (x1+len(cls)*19+60, y1), color, -1) cv2.putText(frame, cls + "-" + str(int(obj_id)), (x1, y1 - 10), cv2.FONT_HERSHEY_SIMPLEX, 1, (255,255,255), 3) fig=figure(figsize=(12, 8)) title("Video Stream") imshow(frame) show() clear_output(wait=True)相關免費學習推薦:php編程(視頻)
V6r少兒編程網-Scratch_Python_教程_免費兒童編程學習平臺
以上就是詳解使用PyTorch實現目標檢測與跟蹤的詳細內容,更多請關注少兒編程網其它相關文章!V6r少兒編程網-Scratch_Python_教程_免費兒童編程學習平臺

- 上一篇

迅速掌握Python中的Hook鉤子函數
簡介Python教程欄目介紹Python中的Hook鉤子函數大量免費學習推薦,敬請訪問python教程(視頻)1.什么是Hook經常會聽到鉤子函數(hookfunction)這個概念,最近在看目標檢測開源框架mmdetection,里面也出現大量Hook的編程方式,那到底什么是hook?hook的作用是
- 下一篇

Python中的下橫線是什么意思
簡介Python中的下橫線是什么意思下劃線一般有兩種情況:1、兩邊都有兩個下劃線的情況:這一般是指內建預定義屬性,這種內建預定義屬性。2、中間一根下劃線:這個命名中兩個單詞的分割線,這個以前OO編程中單詞首字母大寫差不多一個作用,只不過一般python的模塊函數編程會用下劃線分割這種方式。更多技術請關注
相關資訊
